VB.NETでExcelに罫線を引くサンプルです。
サンプル
例)VB.NETでExcelに罫線を引く
Imports Microsoft.Office.Interop
Imports System.Runtime.InteropServices

Protected Sub ExcelBorderSample()

  'Excel関連オブジェクトの定義
  Dim app As Excel.Application = Nothing
  Dim book As Excel.Workbook = Nothing
  Dim sheet As Excel.Worksheet = Nothing
  Dim border As Excel.Border = Nothing

  Try
    app = New Excel.Application()
    app.Workbooks.Add()
    book = app.Workbooks(1)
    sheet = CType(book.Worksheets(1), Excel.Worksheet)
    sheet.Name = "罫線サンプル"

    sheet.Range("A1").Value = "下線・実線(太)"
    border = sheet.Range("A1", "E1").Borders(Excel.XlBordersIndex.xlEdgeBottom)
    border.LineStyle = Excel.XlLineStyle.xlContinuous
    border.Weight = Excel.XlBorderWeight.xlThick

    sheet.Range("A3").Value = "上線・破線"
    border = sheet.Range("A3", "E3").Borders(Excel.XlBordersIndex.xlEdgeTop)
    border.LineStyle = Excel.XlLineStyle.xlDash

    book.SaveAs("C:\sampleborder.xlsx")

  Catch ex As Exception
    Throw ex

  Finally
    Marshal.ReleaseComObject(border)
    Marshal.ReleaseComObject(sheet)
    book.Close()
    Marshal.ReleaseComObject(book)
    app.Quit()
    Marshal.ReleaseComObject(app)

  End Try
End Sub
(実行結果)

その他
線の位置、線の種類、線の太さは以下のものが指定できます。
| 定数 | 意味 |
|---|---|
| XlBordersIndex.xlEdgeBottom | 下 |
| XlBordersIndex.xlEdgeTop | 上 |
| XlBordersIndex.xlEdgeLeft | 左 |
| XlBordersIndex.xlEdgeRight | 右 |
| XlBordersIndex.xlDiagonalDown | 斜線(左上から右下) |
| XlBordersIndex.xlDiagonalUp | 斜線(左下から右上) |
| XlBordersIndex.xlInsideHorizontal | Range内の全ての横線 |
| XlBordersIndex.xlInsideVertical | Range内の全ての縦線 |
| 定数 | 意味 |
|---|---|
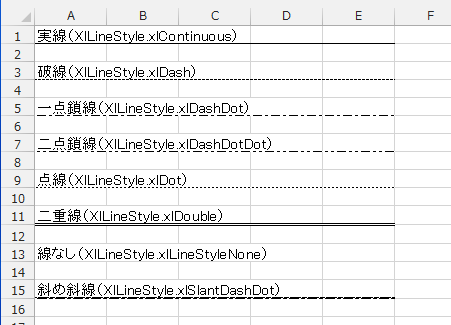
| XlLineStyle.xlContinuous | 実線 |
| XlLineStyle.xlDash | 破線 |
| XlLineStyle.xlDashDot | 一点鎖線 |
| XlLineStyle.xlDashDotDot | 二点鎖線 |
| XlLineStyle.xlDot | 点線 |
| XlLineStyle.xlDouble | 二重線 |
| XlLineStyle.xlLineStyleNone | 線なし |
| XlLineStyle.xlSlantDashDot | 斜め斜線 |
線の種類サンプル
| 定数 | 意味 |
|---|---|
| XlBorderWeight.xlHairline | 極細 |
| XlBorderWeight.xlThin | 細 |
| XlBorderWeight.xlMedium | 中 |
| XlBorderWeight.xlThick | 太 |
備考
- 事前に「Microsoft Excel x.x Object Library」に参照設定が必要です。